
When you want add actual lifelike looking valves into your Plant3D model, you have two choices. Either you use the standard Plant3D geometry, which looks a bit odd sometimes. Or you import some geometry from other 3D software. But in this case you will soon run out of your computer power, because these step, iges, or even the inventor files are not optimized for repeated usage in Plant3D. You might need to insert the same valve dozens or hundreds of times in the same model. A third very boring option is to make Autocad blocks for each valve-type and size. But if you have 10 types and 20 sizes for each, then we are talking about two hundred different blocks.
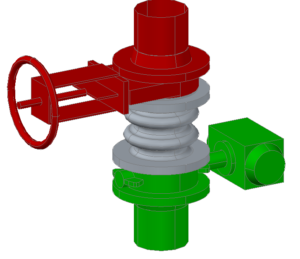
For this problem I am offering a solution with my Python Valve App. By installing my app you will be able to create python based valves. These valves are all parameter based. Thus you can customize them by changing their parameters. Therefore you can use them the same way as the original valve geometries provided by Autodesk. But they will look more life-like without the need of huge computer-power.
This new app is very similar to my older apps which are for cable trays, pipe supports and lined pipe segments.
Installation
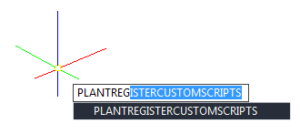
Just run the installer and then start Plant3D and run the PLANTREGISTERCUSTOMSCRIPTS command and close Plant3D.
After this you are ready to use all the new scripts. The installer placed all these new scripts inside your Plant3D Content folder in the CPAK Common\CustomScripts\Python_Valve folder. Moreover in the CPAK Common\Python_Valve you will find a sample catalog and a sample drawing. You can start using these files immediately.
Using Python Valve in Spec Editor
In the Spec Editor you just need to open one of the the actual project's spec sheets and open the newly got sample catalog and add the new valves to this spec. After refreshing the spec in Plant3D you can start inserting your brand new valves into your 3D model. You can see the the whole process in the below video:
Customizing Python Valve
First it is important to create a copy of my sample catalog. You should do it because otherwise a reinstall will overwrite the sample catalog. Meaning all changes and work will be gone. Once you made the copy, you can start changing the parameters of the valves and joints. For example if you are using a very similar butterfly valve standard as I have created you just need to change maybe one or two parameters. After that you are ready to go. For creating a completely new valve type I recommend using the "Export to Excel" and "Import from Excel" buttons. Because they make your work much faster. The Spec Editor can do its job. But entering many-many parameters is much better in Excel. I show all the customization process below:
Would you like to check my app?
Check it on the Autodesk App store:
Is there an easy way or a different download that will switch all parts from MM to Inches?
Sorry for the (very) slow reply:
The latest version of my app contains a sample catalogue in mm, and another catalogue in inches. So no switching or conversation needed.
after you have created the valve in the pipe spec and once you have placed it into your 3D model can you edit/change any of the parameters using the properties dialog palette? for instance can you change the face to face length or do you have to create a new valve in the spec editor for different lengths but the same size? we run across this instance a lot with butterfly control valves.
Unfortunately I dont know why but the Component Designation “Custom” does not work for valves in Plant3D (they dont become editable by the properties window).
So you have to make a new item in the catalogue / spec for every different face-to-face sizes.
At least this is according to the best of my knowledge.
Is there a way to add an actuator to a ball valve (like you have for butterfly)?
Hello Tom,
Replied to you via email.
Tamas
Are you going to add flanged ball valves at some point?
Sure thing, in the next update it will be there.
Also, what resources do you use for determining face-to-face dimensions for the valves, is it ASME B16.10?
Do you have an expected release date for the next update?
Possible to be use as addon on Caesar II software?
No it is not. This is only for Plant3D.
Is there a way to add an actuator to a ball valve (like you have for butterfly)?
Hi!
It needs some scripting to do that.
If you really need it write me an email with some datasheet of the actual valve you want to show in plant3D.
Tamas
Hi, Tamas
Can i know how you can add actuator written by python script in to valve body which also written by python scirpt please.
Thanks
Hello Tien,
As far as I know it is not possible to add python based actuators. At least when I last checked it was not supported.
Hallo
ist es möglich die Regelarmaturen so zu sagen Antrieb in Richtung der Flansche zu drehen, weil die meisten Regelarmaturen so aufgebaut sind, wenn ich die so ändere dann sehen die nicht so aus als ob es eine Regelarmatur ist.
mfg Alen
You can rotate the actuator of the butterfly valves with the DLT value. But for the other valves I did not really see the point to add this feature. For which is exact valve-script do you need this addition?