
Once you have purchased my Smart Tray application, just download the app from the Autodesk App Store. After downloading the install file, run it so the executable file can place the necessary files to their place.
Then you just have to start Autodesk Plant3D as usual. If everything went smoothly you should see a new tab at the ribbon: Smart Tray.

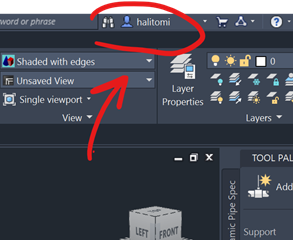
Smart Tray Licencing
The app generally speaking need continuous internet connection. Time-to-time it is checking that you have the authorization of using the app. So please remain signed into your Autodesk Account ALL times (even if you are not connected to the internet).
Hence, if a check (it is not executed with every usage to save computing power and bandwidth) cannot verify your app-using authorization (no internet for example), you have a limited number of uses left before the app’s functions stop working. There will be a warning message in the Command Line with a counter if this function is activated.
But once you reconnect to the internet and to the Autodesk App Store, the functions will start working again if your subscription is still active.
Please note that these functions will only work if you are using my Python Cable Tray application for drawing the cable trays.
You can check the current status of your authorization and the counter with a dedicated button:
Smart Tools Info

Smart Tray Functions
The app has four main functions and a settings, they are described in details below.
Pipe Replace
![]()
With this function you can draw your cable trays like pipes. Draw the pipes, insert the bends, tees, reducers as you would while routing pipelines. You can use all the Plant3D functions. Draw pipelines from the end-point of the fittings for example, or just extend the pipelines by grabing their endpoints. Once you are satisfied with it just choose this function and select the whole route, Smart Tray will replace all the pipes with cable trays with the correct length and width.
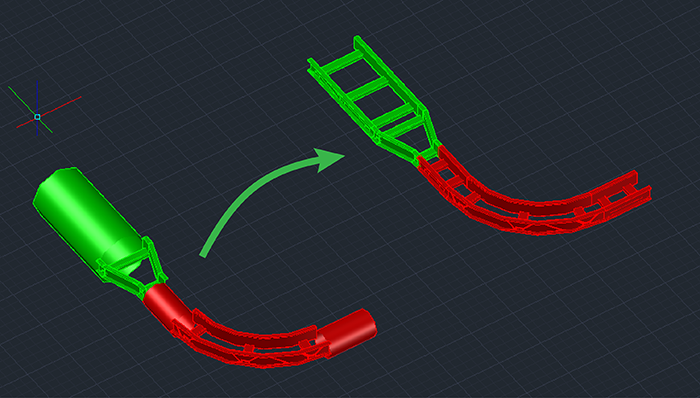
Just make sure that the selected spec is a Cable Tray spec created by the scripts from my Python Cable Tray app and you have a corresponding size among the cable trays. For example if you route a 300 mm nominal diameter pipe, then you must have cable trays with 300 mm nominal diameter.
Tray Replace
![]()
It can happen that you think that the design is final but something comes anyhow which makes you change the design. In this case this function can be handy. This will turn all cable trays back to pipes. This way you can again use all the normal Plant3D piping functions. For example you can extend the pipelines by grabing their endpoints.
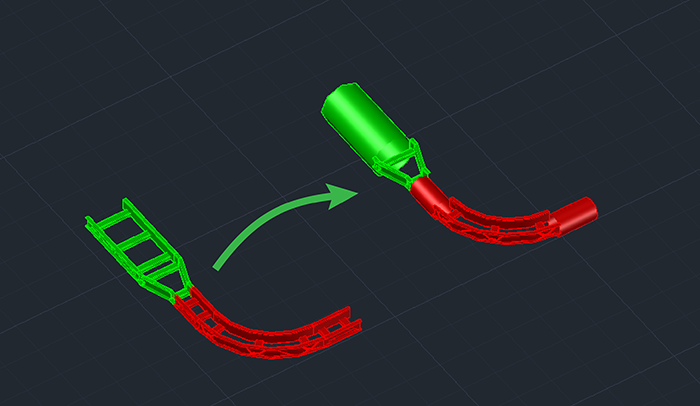
This way you do not need to use the properties window to change the L1 parameter to change the length of a cable tray.
Tray Name
![]()
It can auto-generate the Short Description and the Long Description (Size) for any cable tray. Meaning that you can add the Length (L1) parameter to the cabletray's names. After that whatever list you are making with the in-built tools you will see this parameter in the names. Hence it will be listed on the Iso-drawings, or in the lists created by the Report Creator.
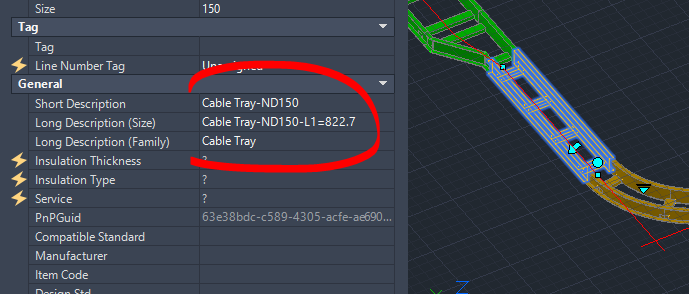
You just select the trays you want to change and you will have the modifications instantly. You do not need to worry about the selection too much either. This function of Smart Tray will only change the properties of the cable trays.
You can adjust the naming conventions on the settings screen, which we will discuss below.
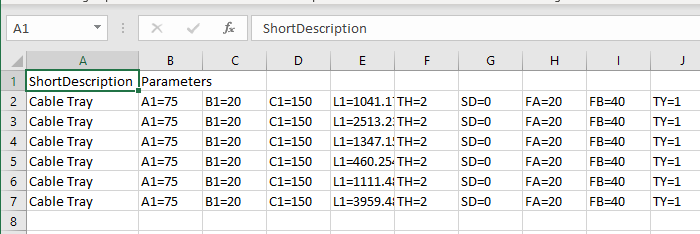
Tray List
![]()
This app can also generate CSV files. So, if you don’t want to change your trays’ descriptions, and also you don’t want to show these parameters on the ISO drawings, but still want a list of the parameters, that is fine.
You can directly generate a CSV file with the Smart Tray app.
Similarly, to the first function, here you have to select the trays which you want to include in the list. Again, you do not need to worry about the exact selection. This function will only list the straight cable trays.
You can also adjust the column types and their order in the settings window, which we will discuss below.
Smart Tray Settings
![]()
You can change the rules of the auto-generated lists and naming conventions. You can modify them to fit your needs. Your cable-tray uses different, special parameter-names: no problem there. Or you want to add the nominal diameter to your long description (size). It can be also done. Smart Tray is highly customizable, and the options will just increase as future updates will come out.
Naming tab
At the naming tab you change the settings of the automatic-name generator for the trays' description.
You can toggle if you want to change the trays' short description or not. If you want to change it, you can decide the order of the sub-parts of the automatically generated names. You can add to the name the Nominal Diameter, or you can add the selected Parameters and so on.
You can also change which separator shall be used between the sub-parts of the automatic-naming and you can select which parameters shall be listed if you add the Parameters to the name-generator.
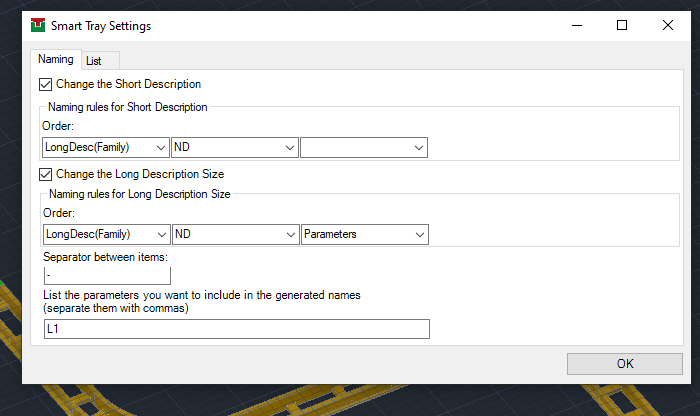
All these options are available for the long description (size) as well. Therefore you can decide to change the Long Description (size) only and leave the Short Description as it is.
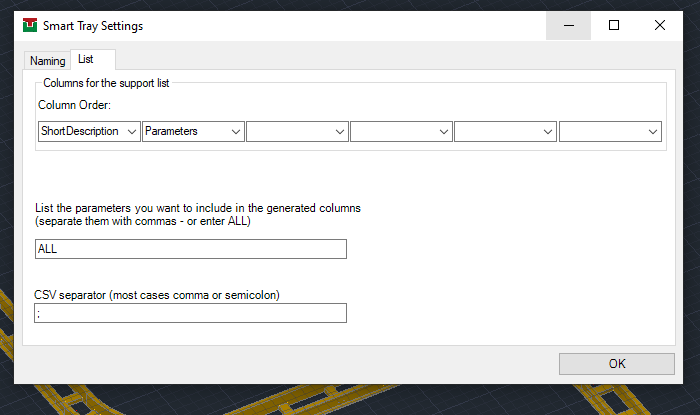
List tab
On the list tab you adjust how the generated CSV file should look like. You can set the order of the generated columns and you can also set which parameters you want to show in the table. If you write a number of parameters, then those parameters will be listed in separate columns in the order you have written them here.
Summary
At the time of writing, this is the list of features available in my Smart Tray application. Your feedback is important to me, whether it's a suggestion, comment or question. As a new app in a new field, every comment helps, whether it's a compliment or a complaint. Please don't hesitate to reach out to me via email or leave a comment below the blog post.
And as mentioned above, every topic covered here is shown in this video as well: